Problem: Windows automatically goes to dark or light mode, no matter what is set in the system settings. Even worse: when you change the mode in the system settings, windows switches back after a few seconds.
(more…)Category: Windows
-
How to fix slow network speed with Windows 11 to local NAS via Samba / SMB Share
Problem: I replaced my Windows 10 computer with a new Windows 11 one. On W10 I usually see a throughput to my Synology NAS of close to 1 Gbit/sec. On W11 the throughput was ways slower: I only got ~300 Mbit/sec when copying to/from the Samba Share.
(more…) -
How to change File Creation time using Windows Powershell
I don’t want to blame the time shift 2x a year. At least as long as I do not forget to change the time on my camera as well! As I am doing most of my photography on hikes and geo tag them afterwards, It makes quite a difference if the file creation time is right or wrong.
This year I forgot to change it on the camera and needed to bulk-change the file time later. Luckily this is pretty easy using Windows Powershell and the Windows PowerShell ISE (Integrated Scripting Environment):
$files = Get-ChildItem "C:\Users\[....]\*.arw"
foreach ($f in $files){
    $d1 = [System.IO.File]::GetCreationTime($f.FullName)
    $d2 = $d1.addHours(1)
	[System.IO.File]::SetCreationTime($f.FullName, $d2)
    echo $d1
    echo $d2
    echo ---
}
Just copy it into the ISE, execute, done.
-
How To Quickly delete large folders in Windows
Deleting folders with a huge amount of files can be tedious in Windows Explorer: You might end up in watching a progress bar preparing and deleting a lot of files. Even if you don’t want the files to be moved to trash.
If the files should just be deleted, this can be done easier with the command line:
cd foldername
DEL /F/Q/S *.* > NUL
cd ..
RMDIR /Q/S foldername
That’s it!
A lot of explanation / evaluation and even a Context-Menu-Shortcut can be found at this Ghacks article.
-
Where to install custom / portable programs in Windows10/8.x?
There are a couple of programs that cannot be installed / put into the regular locations (c:\Program Files and
c:\Progam Files (x86)) as they cannot be run in non-administrator mode. So – where should you put / install those programs?Fortunately Windows comes with a good place for those programs. Just put them into
%LOCALAPPDATA%\Programswhich expands toC:\Users\...\AppData\Local\Programs.
No need to tweak permissions (as it is in your user directory).Downside: If you are part of a large domain (which you will not be with your private computer), your programs will not be synchronized to other computers where you log on. If you would like that you would have to place it in
%appdata%(which expands toC:\Users\...\AppData\Roaming). But it would also mean that possibly large installations are synchronized. Don’t blame Windows if you are suffering from long login-times then!In case you want to go deeper into the differences between Roaming, Local and LocalNow, have a look at the answers at superuser.com:
Roaming. (%appdata%) contains data that can move with your user profile from PC to PC – because data is synced with a server (e.g. web browser favorites or bookmarks.
Local. (%localappdata%) contains data that can’t move with your user profile. This data is typically specific to a PC or too large to sync with a server (e.g. temporary files).
LocalLow. (%appdata%/…/locallow) contains data that can’t move, but also has a lower level of access. E.g., a web browser in protected or safe mode, will only be able access data from the LocalLow Folder.
-
How to fix: Windows 10 store fails to update or hangs during download / update
For a couple of days I saw some pending updates in my Windows 10 store that didn’t seem to install or download. The downloads were either in progress or done but none of them installed. Restarting the downloads didn’t help either.
Some quick research came up with all kinds of Powershell and registry hacks. Quite weird. Then I remembered about a recent issue that I had with Windows 8.1 which was solved by simply disconnecting the Microsoft account and reconnecting it after a restart. And it worked!
Dead easy
- Go to account settings: Hit the Windows Key, type “Account” (german: Konto)
- Disconnect from your Microsoft account
- reboot (optional – I didn’t try without reboot)
- Reconnect to the Microsoft account
- Open the Store and do the update
-
Windows install error 0x80070002 unable to install App
Yesterday I tried to install a Windows App via its built in App Store. Usually this works like a charm. This time the download seemed to succees (judged by the progress bar) but the installation failed with error 0x80070002;
Googling (and Bing’ing) found various issues with kind of the same description, ranging from “download failed” to “broken registry” (including repair guides). Yet none of the proposed solutions worked for me.
Hoping it would just be a temporary failure on the store side, I hit “retry” again and again while I was searching for other solutions (interrupted by a reboot – well you never know, sometimes it just helps). And suddenly a message appeared saying that a Microsoft account was required to install the app. That was strange as I had just switched to a MS account this day – and this message appeared just once! When I wanted to reproduce it it just failed with 0x80070002 again.
So I disconnected my account from MS again, reconnected afterwards and suddenly: The installation succeeded!
To make a long story short
If you experience an error 0x80070002 when installing an App from the store in Windows 8.1: Try to disconnect and reconnect your account from and to a Microsoft account:
- Win-C (open charms bar)
- Go down to settings
- Go down to PC settings
- Go to Accounts >> your account
- Disconnect your account
- Repeat the above to reconnect to your MS account
- Try to install the App
-
Windows Tomcat start failed command 127.0.0.1 could not be found
I just installed Tomcat 7 on my Windows machine and tried to fire it up through Netbeans. But instead of a running server, I just got an error message that command 127.0.0.1 could not be found (Localized error message: Der Befehl “127.0.0.1” ist entweder falsch geschrieben oder konnte nicht gefunden werden.).
I remember that I read about it in a Tomcat bugtracker (but can’t find it any more). Well the solution is pretty simple:
Just open[tomcat home]\bin\catalina.batand remove the “-characters from lines 196 and 201 (in the code snippet below it’s line 1 and 6):set JAVA_OPTS=%JAVA_OPTS% %LOGGING_CONFIG% if not "%LOGGING_MANAGER%" == "" goto noJuliManager set LOGGING_MANAGER=-Djava.util.logging.manager=org.apache.juli.ClassLoaderLogManager :noJuliManager set JAVA_OPTS=%JAVA_OPTS% %LOGGING_MANAGER%
-
Epson XP-205 Scanner in Windows 8.1 – How to get it back to work
Now it’s time for a Epson XP-205 Scanner to work with Windows 8.1
It took me a while now to get the XP-205 scanner component to run on my new Windows 8.1 via WiFi:
The problem is, that when you install the scan software, you might get a communication error telling you that the scanner is probably not connected or turned off. Both of course is not the problem.
So how you get it online in Windows 8.1:
- First install the Epson Scan software that you can obtain directly from epson (german version link).
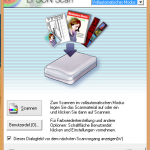
- Open the scan software and verify that you (still) get the error.
 Then change to the Windows-Tile screen (just hit the Windows-Key on your keyboard) and type “Epson Scan”. A list should appear that shows the Epson Scan entries. One of them should be “Epson Scan Settings” (german: Epson Scan-Einstellungen).
- Now comes the tricky part:If you work as an administrator (which you shouldn’t do usually), just open the Epson Scan Settings tool. Otherwise right-click the Epson Scan Settings tool and start it with administrator privileges. This is very important! Otherwise you won’t be able to do the next step as an important part is greyed and thus unavailable!
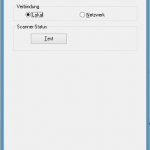
- You should see the settings window with “Connection local” selected.
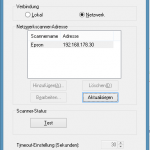
 Hit the “Network” button and then hit the “add” button below the Networkscanner address field.
If this button is disabled, you probably do not run the program with admin privileges.- Add the Scanner’s IP and give it a name.
- Hit the Test button – it should work now!
 The scan software should work now. I first had some issues that I also had to run it with admin privileges. Sometimes I could start the scanning software, showing the correct user interfacec but it only scanned a very tiny part of the physical scan area (VERY strange).
So if you still experience some issues: Try restarting the computer first! If this doesn’t work, try starting as administrator.
Update: The Scan software surprised me today with a message similar to “ah no – I won’t scan today”. So I
- uninstalled the scan software. Well I tried, the files were still in the windows directory.
- let the Software updater update the firmware of the device
- reinstalled Epson Scan
And – suddenly everything is just fine.