Bilder in Java darzustellen ist keine große Kunst, dazu gibt es auch ein Tutorial von Sun. Etwas schöner wären aber abgerundete Ecken. Und noch schöner wäre es, wenn wir einfach eine kleine Componente hätten die das alles selber macht, die wiederverwendbar wäre und die im GUI-Editor einfach zu bedienen wäre. Gesagt getan.
Die Anforderung ist also eine Gui Componente, die im Gui Editor (NetBeans in meinem Falle) wiederverwendbar ist (also ein JavaBean), der man ein Bild übergeben kann und bei der die Ecken abgerundet sind. Wenn möglich, wollen wir sogar noch einen Rahmen setzen können. Ein kurzer Blick auf die Seite “Painting in AWT and Swing” zeigt, dass wir paintComponent() überschreiben sollten. Die Componente soll sich der Einfachheit halber der Größe des Bildes automatisch anpassen.
Die fertige Klasse sieht dann so aus:
public class ThumbPanel extends JPanel {

    protected BufferedImage image = null;
    public static final String PROP_IMAGE = "image";
    protected int roundness = 10;
    public static final String PROP_ROUNDNESS = "roundness";

    public ThumbPanel() {
        init();
    }

    private void init() {
        setOpaque(false);
    }

    protected void update() {
        if (image != null) {
            setSize(image.getWidth(), image.getHeight());
            setPreferredSize(new Dimension(image.getWidth(), image.getHeight()));
        }
    }

    @Override
    protected void paintComponent(Graphics g) {
        if (image == null) {
            return;
        }
        g.setClip(new RoundRectangle2D.Double(0, 0, image.getWidth(), image.getHeight(), roundness, roundness));
        g.drawImage(image, 0, 0, null);
        g.setClip(null);
    }

    public int getRoundness() {
        return roundness;
    }

    public void setRoundness(int roundness) {
        int oldRoundness = this.roundness;
        this.roundness = roundness;
        firePropertyChange(PROP_ROUNDNESS, oldRoundness, roundness);
        update();
    }

    public BufferedImage getImage() {
        return image;
    }

    public void setImage(BufferedImage image) {
        BufferedImage oldImage = this.image;
        this.image = image;
        firePropertyChange(PROP_IMAGE, oldImage, image);
        update();
    }
}
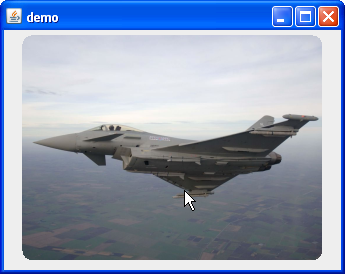
Getter und Setter sind selbsterklärend. Update() passt die Komponente der aktuellen Größe an. Ein Null-Images possiert in meinem Anwendungsfall nicht, wäre aber offenbar kein Problem das anzupassen. PaintComponent() setzt die Clip-Eigenschaft und malt dann das Bild auf die Komponente – fertig! Das ganze sieht dann so aus:
 So weit so gut. Nun will man aber vielleicht noch einen Rahmen (=Border) dazufügen. Standard Borders sehen dabei nicht ganz so praktikabel aus, da sie an den Ecken abgeschnitten werden. Also muss wohl oder übel eine eigene Border her. Schön wäre ein Rahmen, bei dem man Farbe, Dicke und Rundung einstellen kann. Der Versuch, die LineBorder zu extenden war nicht wirklich von Erfolg gekrönt, da man dabei Dicke und Rundung nicht separat einstellen kann.
Also selber malen. Linien mit RoundRectangle2Ds zu zeichnen, wollte nie so wirklich schön werden. Insbesondere sobald die Dicke > 1 Pixel sein sollte. Alternative: Roundrect fill und innen wieder Clip’en. Nur dumm, dass sich das Clip dann auch auf das Bild übertragen hatte. Also per AlphaComposite das Innere einfach ausschneiden. Damit auch bei mehrfachen repaints, nicht immer ein BufferedImage für den Rahmen erzeugt werden muss, wird das Ergebnis einfach gecached. Die ganze klasse sieht dann so aus:
public class MyRoundBorder implements Border {

    private PropertyChangeSupport propertyChangeSupport = new PropertyChangeSupport(this);
    protected int roundness = 10;
    public static final String PROP_ROUNDNESS = "roundness";
    protected Color color = Color.BLACK;
    public static final String PROP_COLOR = "color";
    protected int thickness = 1;
    public static final String PROP_THICKNESS = "thickness";
    // buffer the created image because recreating a complete image could waste precious time
    protected SoftReference cache = new SoftReference(null);
    protected Rectangle oldR = new Rectangle();
    protected Rectangle oldC = new Rectangle();

    public MyRoundBorder() {
    }

    public MyRoundBorder(int roundness, Color color, int thickness) {
        this.roundness = roundness;
        this.color = color;
        this.thickness = thickness;
    }

    public int getThickness() {
        return thickness;
    }

    public void setThickness(int thickness) {
        int oldThickness = this.thickness;
        this.thickness = thickness;
        propertyChangeSupport.firePropertyChange(PROP_THICKNESS, oldThickness, thickness);
        cache = new SoftReference(null);
    }

    public Color getColor() {
        return color;
    }

    public void setColor(Color color) {
        Color oldColor = this.color;
        this.color = color;
        propertyChangeSupport.firePropertyChange(PROP_COLOR, oldColor, color);
        cache = new SoftReference(null);
    }

    public int getRoundness() {
        return roundness;
    }

    public void setRoundness(int roundness) {
        int oldRoundness = this.roundness;
        this.roundness = roundness;
        propertyChangeSupport.firePropertyChange(PROP_ROUNDNESS, oldRoundness, roundness);
        cache = new SoftReference(null);
    }

    public void addPropertyChangeListener(PropertyChangeListener listener) {
        propertyChangeSupport.addPropertyChangeListener(listener);
    }

    public void removePropertyChangeListener(PropertyChangeListener listener) {
        propertyChangeSupport.removePropertyChangeListener(listener);
    }

    @Override
    public void paintBorder(Component c, Graphics g1, int x, int y, int width, int height) {
        Graphics2D g = (Graphics2D) g1;

        BufferedImage buffered = cache.get();
        Rectangle newR = new Rectangle(x, y, width, height);
        if (buffered == null || !c.getBounds().equals(oldC) || !oldR.equals(newR)) {
            buffered = new BufferedImage(c.getWidth(), c.getHeight(), BufferedImage.TYPE_INT_ARGB);
            Graphics2D tmpg = buffered.createGraphics();
            tmpg.setRenderingHint(RenderingHints.KEY_ANTIALIASING, RenderingHints.VALUE_ANTIALIAS_ON);
            tmpg.setClip(g1.getClip());
            tmpg.setColor(color);
            // fill area
            tmpg.fillRoundRect(x, y, width, height, roundness, roundness);
            // cut out inner
            tmpg.setComposite(AlphaComposite.getInstance(AlphaComposite.DST_OUT));
            tmpg.fillRoundRect(x + thickness, y + thickness, width - (2 * thickness), height - (2 * thickness), roundness, roundness);
            tmpg.dispose();

            cache = new SoftReference(buffered);
            c.getBounds(oldC);
            oldR = newR;
        }
        // draw border upon image
        g.drawImage(buffered, 0, 0, null);
    }

    @Override
    public Insets getBorderInsets(Component c) {
        return new Insets(thickness, thickness, thickness, thickness);
    }

    @Override
    public boolean isBorderOpaque() {
        return true;
    }
}
Die Getter/Setter sind wieder dazu da, eine schöne JavaBean zu bauen, damit die Border auch im GUI Editor einfach zu verwenden ist.
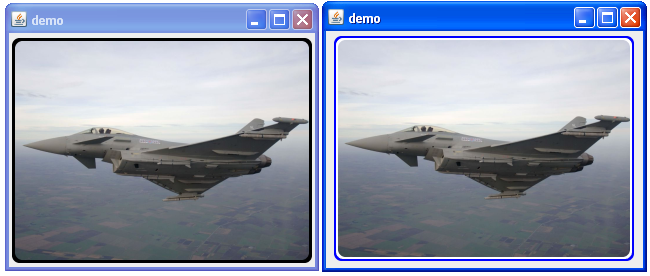
Da normale Borders verwendet werden können, kann natürlich auch eine CompoundBorder verwendet werden – um zum Beispiel anzuzeigen, wenn ein Bild selektiert ist (dann zB mit zusätzlichem weißen Innenrahmen), was dann so aussieht (links einfach, rechts Compond):


 So weit so gut. Nun will man aber vielleicht noch einen Rahmen (=Border) dazufügen. Standard